

AI Dev Tools Zoomcamp is the free course we run at DataTalks.Club.
Across the series we build an application with AI coding agents from the idea to making it production-ready.
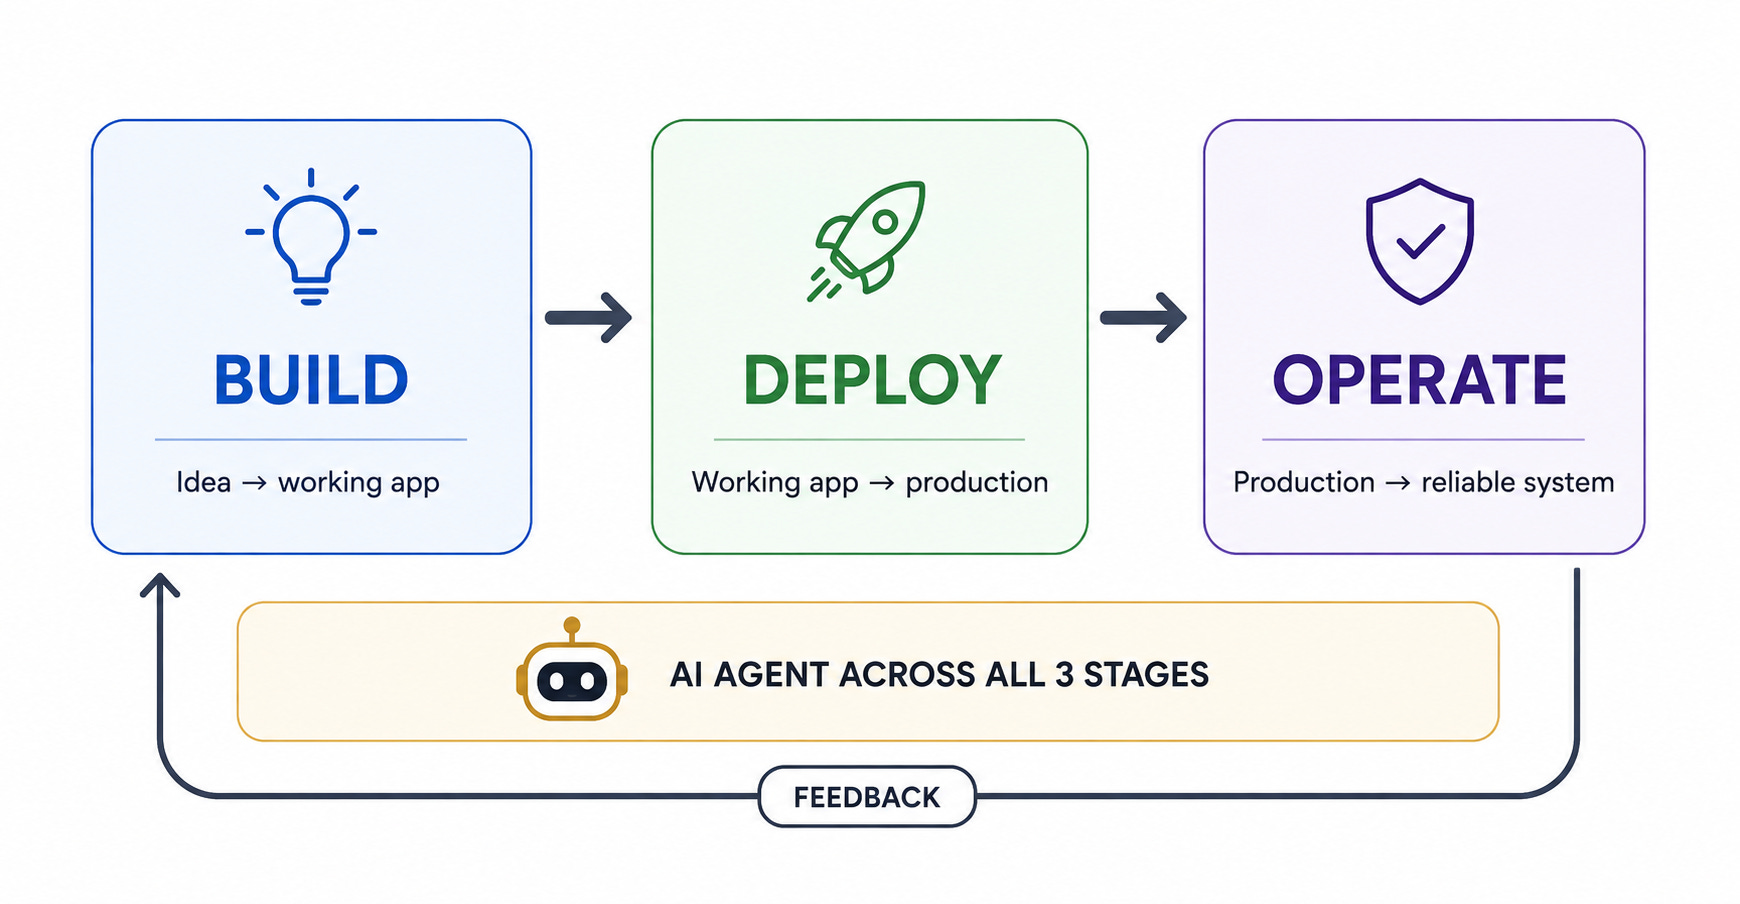
I showed how to do it in 3 stages:
Stage 1: Build - coming up with an idea, creating frontend and backend, and running it locally
Stage 2: Deploy - making the application testable and deployable, and setting up CI/CD
Stage 3: Operate - adding dev/prod environments, collecting metrics, logs, and traces, and having AI agents react to incidents
In this article I’ll put everything together, so you can use it as a reference for developing your projects. I’ll keep it tool-agnostic: I don’t assume any specific coding agent, programming language, framework, cloud, or observability tool.
It doesn’t really matter which assistant you use. You can choose Codex, Claude Code, OpenCode, Grok Build, Cursor, OpenCode, or anything else you like.
I show a sequence of steps you can follow, one after another, to take your product from a vague idea to production.
Each step is a prompt that you can put directly into your coding assistant. In most cases, it helps to start a new session for each step: this way, only the important things are in your agent’s context so it can finish the work faster and better.
Let’s go!
Stage 1: Build
This is the first stage of our process.
In the build stage, we:
Turn the raw idea into a concrete specification
Create frontend and backend, and connect them
1. Specification
If you give a coding agent a vague idea, it’ll fill in the gaps with its own assumptions, and you’ll get an app you didn’t want.
It’s better to be very clear about what you want and capture this in a document called “specification”.
I usually use ChatGPT for that: I open it in dictation mode and do a brain dump with my idea, and then we iterate until it’s clear what it could look like.
You can start your discussion with your AI assistant using this prompt:
I want to build a tool for forming study groups.

Help me set the scope for this project precisely. I want to brainstorm with you and understand how the tool should work. Give me options.

Ask me one question at a time and keep your output short.
At the end, ask the assistant to summarize the discussion into a markdown document.
Create an empty folder for your project, and save the specs into _docs/specs.md.
Use this document to build the frontend.
2. Frontend
I build the frontend before the backend so I can test the idea quickly. It’s the least expensive way: you create a clickable interface and you test it with some mock data. If it looks the way you want, you can continue.
Put this into your coding assistant (or tools like Lovable, v0 or Bolt.new):
Create a system design interview application.

[Paste the ChatGPT-generated specification here.]

Centralize every backend call in one services layer, and create a mock implementation of it so the whole app runs without a real backend.

Add tests.
Save the frontend code in the frontend/ directory.
After you have iterated on the frontend and like it, it’s time to define how it will interact with the backend.
3. Manual test
Come up with a test you can use to validate that your application works. This should be a sequence of actions you perform to ensure the app works the way you want.
For an app that helps you find study partners, it could be something like:
Open the home page, sign up
Create a group for studying
Create an event there
Share the event
Sign up to the event from another browser session
Verify that the sign up is visible in the first session
You can use AI to come up with this scenario, but remember it - and maybe save it to _docs too.
4. AGENTS.md
AGENTS.md is loaded into the agent’s context every time you start a new session. You can add anything that you think is important for your app. For now let’s add one line there:
Make focused, regular commits, and explain your decisions in the commit messages so we can use them as logsLater you can add more things here.
If you use Claude, create CLAUDE.md with a single line:
@AGENTS.md5. OpenAPI schema
We previously asked the assistant to centralize all backend calls in one place. Now let’s use this to create the API specification. We will use this specification to define frontend-backend interaction:
Read the frontend's API client in frontend/

Create openapi.yaml at the repository root that defines every endpoint, method, path, request body, response body, and which endpoints need authentication.
Now we have the specification for our backend so we can build it.
6. Choose the backend stack
Before actually building it, you need to decide which technology you want to use for this application.
Ask the coding assistant to help:
Based on openapi.yaml, propose 2-3 backend stack options. Describe pros and cons for each. Recommend one.You can challenge your AI assistant and ask it some questions, or just accept the option it suggests.
At the end, save the results to _docs/stack.md.
7. Backend
We have selected the technology, so let’s use it to build the backend.
Just like we created the frontend with mocked backend calls, we can create the backend with a mocked database. First, focus on making sure the frontend-backend integration works, and then connect a proper database.
Build backend in backend/ based on `_docs/stack.md` that implements the openapi.yaml spec.
Use an in-memory store and seed it with data so the frontend has something to show.
Add authentication with hashed passwords and bearer tokens for the endpoints that need it.
Write tests.
8. Makefile
I always have problems remembering how to start the backend, how to run the frontend, install the dependencies, and do other things. For that, I usually use Makefiles, so I can just type:
make backendAnd the backend runs. Let’s define a Makefile:
Create a Makefile so I can easily run the application.9. Connect frontend and backend
We created a backend but the frontend still serves the mock data. Let’s connect them:
Switch the frontend to use the real backend client.Use the test scenario from before to make sure it works.
You may do a few iterations here. Test the application and ask the agent to fix the problems you discover until it works correctly.
10. Database
We don’t have a real database yet. Let’s add it. I usually use SQLite for local development, so I’ll use it here too.
Replace the in-memory store with a database. Use SQLite with ORM, so later we can easily switch to a different database. Instead of SQLite, your application may need something else, so you can chat with your coding assistant about it before you implement it.
After it’s done, use the test scenario again and iterate until it fully works.
Stage 2: Deploy
Our app works locally. Great.
Let’s deploy it and make it available for others to use:
Containerize it
Deploy it to the cloud
Automate the deployment with CI/CD
11. Containerization
We need to put our application in a container, so we can later use any container management system for deploying it.
In our local environment, we have two processes: one for the frontend, one for the backend. We need to run them separately. In practice, you usually compile the frontend into static files and serve them with the backend.
So, instead of creating separate containers for the frontend and backend, we’ll create one that serves both:
Create a Dockerfile that builds the frontend with Node, then builds the backend. Backend should serve the frontend.Build and run the image, then verify the flow with the test scenario and iterate until it works.
12. Production database
In the previous stage I used SQLite. It helps with keeping the local setup lightweight, but it’s not a database we can use in production. Typically we use something like Postgres.
You can ask your agent to select the best database for your case, but it’s very likely it’ll be Postgres.
So let’s add it:
Add Postgres support to the backend.Use the test scenario to make sure the app works.
13. Docker Compose
To make it easier to manage the local environment with all the services, we use Docker Compose.
Let’s ask the agent to set it up:
Create docker-compose.yaml with two services: database and the app.Run it with docker compose up and test it.
14. Integration
It’s possible that by now you already have tests. AI coding assistants are instructed to create them. But maybe in your project there are still none or too few.
Let’s make it explicit and ask the assistant to create them.
We also want to have a specific category of tests: integration tests. These tests are used to make sure the interaction between backend and the database is correct.
You can also ask the assistant to help you with finding the right test scenarios to include in the test suite:
Create integration tests that run against docker-compose.yaml. What scenarios should we test?15. End-to-end test
Integration tests verify that the backend can connect to the database.
End-to-end tests verify the entire user-backend flow: from the browser to the frontend, from the frontend to the backend, and from the backend to the database.
So far, we have been doing these tests ourselves manually. Let’s now automate it.
Add an end-to-end test that runs against docker-compose.yaml.

Use Playwright to:

1. <Describe the first step>
2. <Describe the second step>
3. ...

Put the tests in the e2e/ folder in the repository root.
Now we don’t need to repeat this test manually every time we make a change.
16. Deployment stack
Now the application works locally and is properly tested. It’s time to deploy it. But where? There are many options.
Let’s choose what works best for us. Ask the coding agent:
Propose 2-3 ways to deploy the application. Compare cost, complexity and other factors.

<List any other constraints that you have>
It’s also helpful to use an infrastructure as code (IaC) tool to manage your cloud resources:
I want to use an infrastructure-as-code tool for managing my infra. What are my options?It’s possible that for the deployment option you chose, there are no infrastructure-as-code options. In this case, just move on.
17. Deployment
Now that we have selected the stack, let’s deploy.
Ask the agent:
Deploy this application to <Selected option>.If applicable, add:
use <IaC tool> for managing the infrastructure18. CI/CD pipeline
We can deploy a few times manually, but we want to automate it. It’s done with CI/CD:
CI is continuous integration - running tests every time you push to git
CD is continuous deployment - automatically deploying when the tests pass
Create a CI/CD pipeline that:

- runs backend and frontend tests in parallel
- builds the Docker Compose stack and runs integration and end-to-end tests against it
- deploys the application
- validates that the deploy is successful by checking the health endpoint
You probably use GitHub for hosting code, so it’s likely that you’ll use GitHub Actions. If you don’t like it, chat with AI to select a different CI/CD tool.
We successfully deployed our application, but we’re not done yet. We need to make it more production-ready.
Stage 3: Operate
To make it more production-ready, we need to add a few things:
Create dev/prod environments
Capture metrics, logs, and traces
Set up alerts
Have an AI agent taking care of the alerts
Let’s do that.
19. Second environment
Now each push brings the updates directly to the deployment. But what if it has a bug that we missed?
To avoid that, we have two environments:
Dev: the environment for testing. We deploy here on every push
Prod: the environment that real users use. We promote a release from dev to prod only when we confirm that it works correctly
If we use infrastructure as code, it’s trivial to set up. If not, let the agent handle it.
Either way, it’s enough to just ask the agent to do it and it’ll figure the rest out:
Create a second, independent copy of our infrastructure. We will use the copy as production, and the existing infrastructure as a dev environment.20. Manual promotion workflow
Now we automatically release the code to development on every push. Let’s set manual release promotion from dev to prod:
Create a manual GitHub Actions workflow that promotes the dev version to production.21. Split build/deploy
It’s possible that in your CI/CD the build and deploy happen in one step (it happened to me when I was deploying to AWS EC2).
This is an anti-pattern. We want to build the image only once, first deploy it to development, and use it for production too if it works fine.
If for you these steps are not separate, we need to split them. Ask AI if you’re not sure.
Currently we build the image during the deploy stage.

Split it into two stages:

- Build: build the image and push it to a container registry
- Deploy: pull the image from the registry and serve it

The manual prod promotion CI/CD workflow pulls the currently deployed dev image to prod.

Tag each image using the YYYYMMDD-HHMMSS-shortsha pattern (e.g. "20260818-163457-83242da")
Depending on where you deploy your application, you may have to use different options for the container registry. Talk to AI if you’re not sure what to select and how to do it.
22. Observability and OpenTelemetry
Our application is deployed and serving real users in production. But we don’t know how reliable it is.
We need data for that. That’s called telemetry, and we will collect metrics, logs, and traces. The industry standard is OpenTelemetry, so you’ll probably use it.
Instrument the backend with OpenTelemetry.

Include in the telemetry:

- service name
- environment
- deployed version
To “instrument” the backend means to include the code for capturing the telemetry in our application. But we also need to save it somewhere.
23. Choose the observability backend
There are many options for storing the telemetry and displaying the dashboards. Some are open-source but you need to self-host them. Some are fully managed, but you’ll need to pay for using them. Some of the self-hosted options give a generous free tier.
Ask the agent to help us select:
Propose 2-3 options for storing the telemetry (metrics, logs, traces) via OTel and for displaying them on a dashboard.

<If you have any preferences or restrictions add them here>
24. OTel Collector stack
Now we’ve selected the stack. If you decide to go with open-source and self-hosting, you can also deploy it locally:
Add an OpenTelemetry Collector. Create "observability/" directory with Docker Compose for: <list selected technologies>. Keep this as a separate Compose project from the application stack.Then deploy it:
Deploy the observability stack. It should be separate from the application stack. Connect both development and production to it.If you decide to go with a managed service, connect it:
Add an OpenTelemetry Collector for <selected technology>. Help me configure it25. Application metrics
We configured OTel. Let’s collect important metrics.
They are application-dependent and depend on what’s important for your product.
You can also ask the agent to come up with the most important metrics:
What are the most important product metrics I need to track in my application? Give me top 5Start tracking them:
Track the following metrics with OTel

- <List them>
26. Dashboards
We’re tracking the metrics but not displaying them yet.
Let’s fix that:
Display the metrics we export in a dashboard. Make it possible to filter by environment and deployed version.27. Alerts
We can’t babysit the metrics in a dashboard. Instead, we can configure an alert that will fire every time a metric goes too low or too high.
Add an actionable alert for <most important metric>. Include the service, environment, deployed version, owner, and dashboard URL in the alert.It’s also useful to track 5xx error codes and for each error send an alert (or configure a threshold that makes sense for your application). Talk to your AI assistant to set it up.
28. On-call worker
Now when alerts fire, we get an email or a Slack message. But we still need to act on them.
We can have AI watch the alerts and fix the errors when they happen.
Let’s configure it.
Add an on-call-engineer/ directory with a script that connects to our alerts API.

When an alert fires, the script

- wakes up an on-call agent that runs in headless mode
- passes all the alert details

The on-call agent should be able to resolve the issue autonomously and commit the fix.
Your on-call engineer may have instructions that look like this:
You are the on-call engineer for this repository. An alert just fired.

Investigate the root cause. Read the code and reproduce the failure. If you find a real bug, make the smallest correction, run the backend tests, and commit the fix with a clear message.
If the alert is a false positive, explain why and do not change the code.
Stage 4: Going Further
In this article, I gave you 28 concrete steps to bring your idea to production. If you follow them, you’ll have a working application that can serve real users in less than a week.
But there are still many things you need to think about:
Do you use a container manager? If not, consider using one.
Do you use a managed database service? If not, consider using one.
Regularly back up your database and test that the backups actually work.
Learn about VPCs and see if you need one.
When you start getting traffic, learn about scaling and load balancing.
Also, periodically ask Fable or GPT-5.6-Sol Max (preferably both) to audit your code for security vulnerabilities.
I’m only scratching the surface of a “real production system” in this article, but the stages and steps in this tutorial are more than enough to get started.
With this setup, you can use AI to build a product that runs reliably. The rest you can learn when you actually need it.
Have fun building!
And check our AI Dev Tools Zoomcamp if you want to learn more about using AI to increase your development productivity.
Thanks for sharing!! I still uses the stack you gave last year. I am glad the course is back!!